To Install SLiMS 9 (Bulian) on Windows, you need to setup your windows machine as a server. Please follow the steps below:
- To install and use SLiMS, you can use XAMPP or similar platform. XAMPP is one of the most popular platform and SLiMS works fine with it. You can check here to know the detailed process of installing XAMPP. It is advisable to install xampp avoiding your C drive. You may install on D or E drive. Download and install xampp latest version.
- Then you have to download source code of SLiMS 9 Bulian.

Download SLiMS 9 Bulian - Now, go to your xampp installation folder and navigate to htdocs folder. Copy the downloaded source code of SLiMS 9 Bulian and paste under htdocs folder. Then unzip the source code and rename to slims9.
- Start your server (Apache and MySQL) from xampp control panel (can be found under start menu).
- Go to browser and type: http://127.0.0.1/phpmyadmin or http://localhost/phpmyadmin/
- Create database. Let it name slims9
- Now type http://127.0.0.1/slims9 at your browsers address bar and press enter. Here slims9 is your documents root folder name which is under htdocs folder.
- SLiMS 9 web installation interface will appear. Click to Get Started button.

- Now the installer checks all the requirements. Everything should be ok. Ignore yaz error, it will not hamper our installation and other functions. Click Next.

- Since we are going to install SLiMS freshly, we need to click on Install SLiMS.

- In this interface, provide required information like Database Host, Database Name, Database Username and Database Password. In our case, host=localhost, database name=slims9 (we did it at step 6), username=root and password blank. If your settings are different, you need to adjust accordingly.

- After providing all the correct information, click on Test Connection. If connected successfully, you can see Connection Ok, Next. Click on it.

- Now we are in Step 2. Here, if we want to generate sample/dummy data, we need to change ‘No, don’t do that‘ to ‘Yes, please.’
- Provide username and password, then click on ‘Run the installation‘. For test purpose, our username=admin and password=admin

- New SLiMS successful installed. Congratulation, now you have SLiMS in your machine.
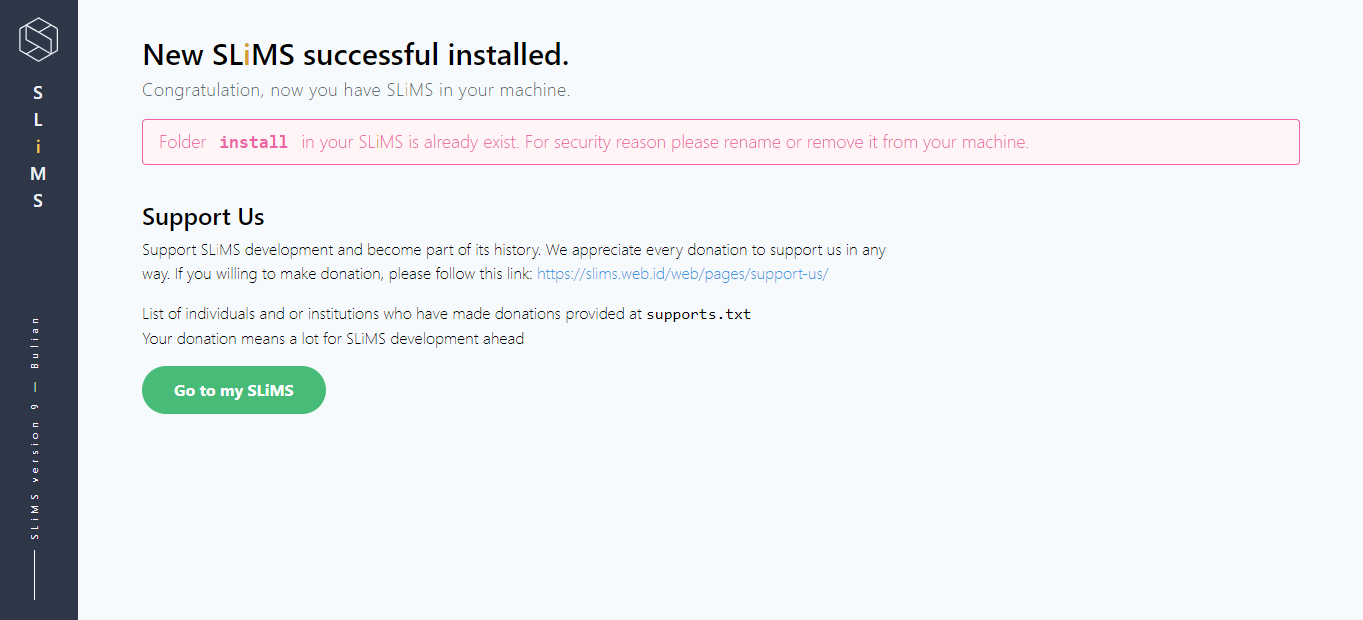
- Click on ‘Go to my SLiMS’ and you can see the interface of SLiMS 9 Bulian.

- To visit admin page, you need to be little bit tricky. When you are on your homepage your url looks like http://localhost/slims9/index.php or http://127.0.0.1/slims9/index.php. You have to add ‘?p=login’ without quotation mark after /index.php and it will look like http://localhost/slims9/index.php?p=login

- In this installation case, we used username and password as admin in step14.

Now we are ready to automate and digitize our library using SLiMS 9 Bulian.
For production server, please use Linux (Ubuntu/Debian) platform. If you have to use windows, please ensure that your windows is authentic/licensed and powerful Antivirus software is installed. Avoid using USB drive on windows machine. And most importantly, Backup Regularly.
Enjoy.
For any support, please email us. SLiMS Bangladesh always beside you to help using SLiMS in your library.